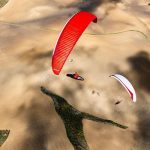
How can paragliders fly?
You've probably been wondering what makes these pieces of fabric fly or why all of the gliders typically have the same shape or even how this flexible structure manages to stay aloft above the pilot's head. Our focus on flight mechanics in this chapter will attempt to provide answers to all of these questions at the very least it will give you the basic understanding you'll need to pilot this peculiar aircraft: a paraglider.
The paraglider's aerodynamic profile
Let's start by looking at the basic shape of our paragliders. We will demonstrate the importance of the wing's profile the goal is to optimize its penetration through the air and reduce drag as much as possible.
We're going to see what happens to the air have it flows over these three profiles: looking at the first profile, a simple plate, the molecules of air contained in the air stream are
completely blocked in the middle, the air that flows beyond the plate is turbulent which significantly increases drag. The airflow over this profile is similar to what happens when rowing a boat the oar needs enough force to displace water and have it displaces the water small swirls form behind it.
The second profile penetrates the air a lot better. As we can see here the result is much
smoother airflow, the molecules of airflow smoothly over the front of the profile. However, too much drag is still created by this profile.
The third profile has been improved so that the airflow is smooth from start to finish our profile will travel through the air with little resistance, thanks to its cambered shape.
It will also reduce drag by replacing the air in its wake. This is an ideal aerodynamic profile.
How a paraglider creates lift
If you were to cut the paraglide in half you'll find this cambered shape along the entire wingspan, from the leading to the trailing edge. This is how manufacturers optimize the
wings penetration and movement through the air, but this doesn't explain what makes a paraglider fly.
Let's move on to a phenomenon that you've probably already heard of: lift.
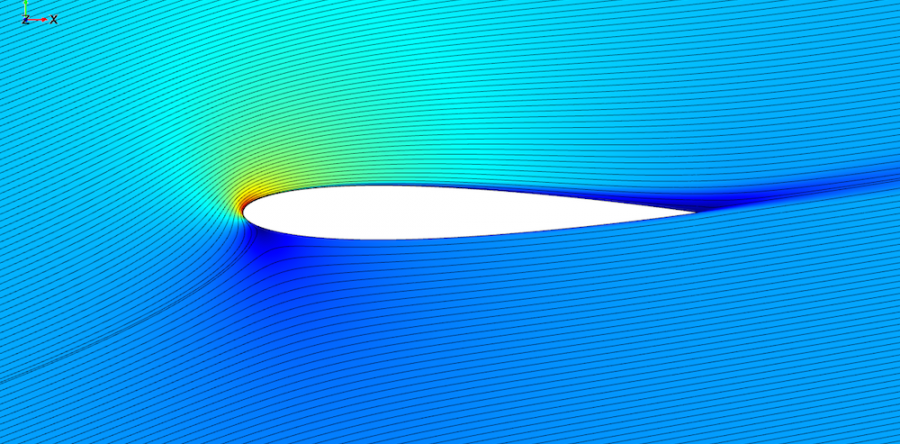
Let's take another simplified cross-section of our wing and observe what happens as air flows over its profile in flight: the angle created by the paraglider swing and the relative
wind is called the angle of attack. As the molecules of the air come into contact with the wing they are separated into two streams by the leading edge the first stream flows along the upper surface of the wing, the other along its lower surface even though. The upper surface is longer than the lower surface. Experiments have shown that both air streams reach the trailing edge at the same time: there's only one way for the molecules taking the longer route along the upper surface to arrive at the same time, they have to accelerate.
Thanks to a principle formulated by Swiss mathematician and physician, Bernoulli, in 1738, we know that half the speed of a fluid increases its pressure decreases. In other words, the faster-moving air over the upper surface of the profile creates a low-pressure zone on top of the wing which is the source of lift. On the other side of the wing, air molecules push against the lower surface, creating a high-pressure zone. This is also a source of lift. About 3/4 of the lift results from the low pressure above the wing and 1/4 from the high pressure under it. Most of the lift occurs near the profiles leading edge.
This simplified explanation of what causes lift should help you understand why our wings fly.
Aerodynamic forces in a paraglider
Lift is thus created by the flow of air over the profile, but how is this phenomenon is sustained when there isn't any wind? what is the paraglider's motor?
In order to answer these questions will turn to the science of mechanics. This science deals with the action of forces on bodies. The forces we're interested in are those that act upon the pilot and paraglider.
Let's start with a simplified model of the low and high-pressure zones lift. This force acts upon a point known as the center of pressure. This point is merely an average of the lift forces acting upon the paraglider. When travelling through the air a paraglider encounters resistance and creates turbulence in its wake the force that opposes its forward movement is known as drag. Since these are the two main forces that act upon the profile we can add them: their sum gives us the resultant.
The altitude is the "fuel" of a paraglider
How do we obtain the relative airflow necessary to create lifts when there isn't any wind? By simply transferring his weight to the wing, the pilot pulls it towards the ground forcing it to move forward through the air. This movement we call airspeed and this creates the relative airflow required to reduce lift.
Altitude, therefore, is the paragliders energy reserve and by using our weight to draw on his reserve we're able to fly.
The angle of attack in a paraglider
As mentioned before the angle of attack is the angle at which the relative wind meets the profile this angle should not be confused with the angle to the horizon, learners attitude.
As it's possible to have a relatively high angle of attack with the wing at any attitude, in normal flight the paraglider remains at a constant angle of attack and at a constant airspeed. The pilot can influence the angle of attack and thus the speed by using the brakes or speed system. The angle of attack and airspeed are very much related: if you change the
angle of attack the airspeed too will change until a new equilibrium is achieved. The angle of attack can be increased by applying the brakes, evenly this causes a corresponding decrease in airspeed. The greater the angle of attack, the more lift is produced, however,
more drag is also produced. If too much brake is applied then the smooth airflow over the profile cannot be maintained and the airflow breaks away from the top surface: This is known as a stall.
Being aware of the stall is very important when learning to fly since inadvertent stalls are very dangerous and should be avoided, always keep your hands high and make sure you feel good airspeed on your face whilst trying to avoid the stall.
Only when making the landing flare should you use deep brake inputs.
The angle of attack can be decreased using the accelerator system, as the angle
decreases drag is reduced and the speed increases. The glider continues to accelerate until a new equilibrium is found, the wing then stabilizes at this new speed and sync rate.
At low angles of attack, paragliders are more prone to collapse. This is why you should not use the speed system when close to the ground or flying in turbulent air.
Lift to Drag ratio in a paraglider
Let's turn to the concepts of lift-to-drag and glide ratios. The lift-to-drag ratio is the angle at which the paraglider glides. These concepts will help you understand why a student barely manages to lift off from a slope. There are simply ratios that measure the glide capability of your wing, these ratios are obtained by dividing the horizontal distance covered by the vertical distance lost. In an example, 750 meters divided by 100 meters gives us a ratio of seven and a half.
As you may have guessed, the greater the horizontal distance is the greater this ratio will be and the longer your glide. This is called your lift-to-drag ratio, it's a technical specification of your wing. The lift-to-drag ratio doesn't change unless the wing is damaged.
We'll see later on in the flight chapter that the wind or micrometeorology can influence the trajectory the distance covered will vary and in this case, would refer to its glide ratio.
Let's go back to the example with our student: he can't lift off because his lift-to-drag ratio is too close to the angle of the slope. The launches will need a hill whose slope is steeper than the lift-to-drag ratio of our wings.
Modern paragliders have a lift to drag ratio between six and ten to one. For reference, you can compare this with a lift to drag ratio of 15 to one for hang gliders and almost sixty to
one for sale planes.
Speed to fly in paragliding
Paragliders have a large speed range and knowing when to use these different speeds is very important. You have control of the speed with the brakes and the speed bar. This
is known as speed to fly.
Knowing to fly at the right speed depending on conditions or the site is the basis of safe and efficient piloting. Understanding different flying speeds will make you a better pilot, the correct speed and just the right timing makes it possible for the student to make a smooth landing.
As a general rule when in lift slow down and when in lift or headwind speed up. This increases your efficiency and prolongs your glide performance. Flying at trim-speed your glider will achieve its best glide angle in calm air. The pilot's arms are high with no pressure on the brake handles. At this speed, the profile isn't warped in any way and therefore create the least amount of drag flying like this will allow you to cover the maximum distance. Most modern paragliders have a trim speed of around 36 or 37 km/h. When learning the main reason for flying at such a speed is to accelerate before landing and build up energy that will eventually be converted into a flare. This makes a soft landing possible flying at trim speed also reduces the likelihood of problems caused by the wind gradient, such as inadvertent stalls or sudden altitude
last near the ground.
Applied the brakes approximately 30 to 40 centimetres to reach the minimum sink rate. The pilot's arms are about level with his shoulders or just below and there is a positive pressure through the brake handles. Applying pressure to the brake handles will also improve your sensitivity to the wings movements and increases the internal pressure and
angle of attack of the wing which reduces the likelihood of collapses. Flying at min sink increases the angle of attack and significantly increases drag which reduces the ability to glide and consequently reduces the distance that can be covered. However flying like this gives you the slowest vertical speed, in other words, you sink at the slowest rate. You can
take advantage of this when flying in lifting air.
Note also that other than the landing flare it is never necessary to fly slower than the minimum sink rate.
This post is a transcription of the video "Learn to Fly" (Kitchen Productions)